I got carried away making doll size cleaning supplies and when I sat down to put this post together, it was way too long! I decided to split it into 2 parts. Today I will show you how to make a doll size mop, mop bucket, wet floor sign, and even a little shiny wet floor! It’s everything you need to keep the doll house floors spotless!
I love the details in doll accessories for scenes and for play and imagination. It is fun when those accessories point back to everyday life. You know like chores! Ha! 🙂

Let’s get on to today’s chore, mopping.

Morgan’s had a lot of practice rinsing the mop,
wringing it out,
and mopping the floor.
In high traffic areas she always puts out the “Caution! Wet Floor” sign.
All of these cleaning item are from things I had around the house. For this project you will need-
- cotton yarn
- cardboard
- scissors
- glue
- wooden dowel
- yellow duck tape
- permanent marker
- black craft foam
- Nestle Toll House Cocoa container
- black and silver buttons
- clear sheet protector
Mop
First let’s make the mop!
Wrap yarn around a piece of cardboard that is 4″x 4″. When done, bend the cardboard in half and carefully slide the yarn off. As you lay it down, try to keep the yarn together in a bundle.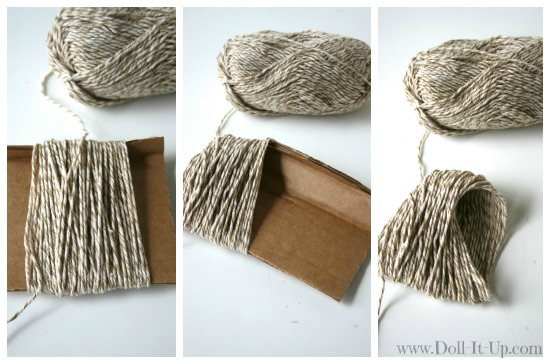
A dowel will be the handle for the mop. I used a 3/8″ dowel because that’s what I had on hand. The overall length of the dowel is 13 1/4″. Poke the dowel end into the center of the yarn. Position it on the dowel about 2″ into the mop head. Use a generous amount of glue around the handle in the yarn.
Pinch the end of the yarn around the dowel.
Tie a piece of yarn tightly around the yarn on the handle about 3/4″ from the end of the mop head. 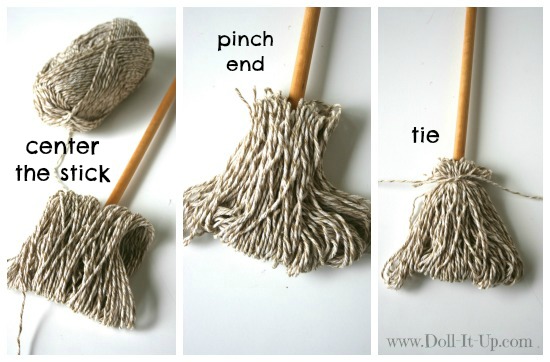
Wrap the yarn around a number of times and tie it off tight. Give the mop end a shake to tousle the mop head and make it look realistic. 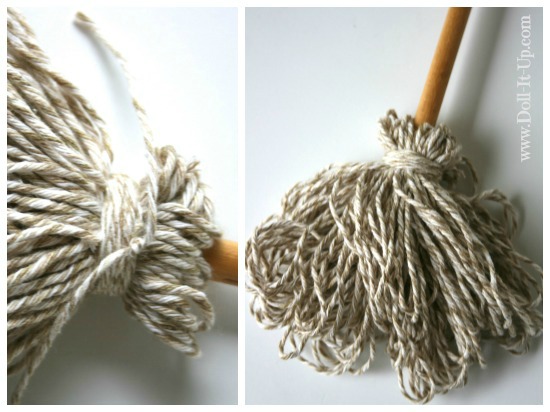
A Shiny Wet Floor
It seems like the right time to talk about that shiny wet floor that comes with mopping! The wet floor is subtle in the pictures and really fun in real life! To make your own wet floor cut the edges off of a sheet protector until you have a single side of the sheet protector. Cut it in a random smooth shape to resemble a splash of water. 
Caution Wet Floor Sign
Now that the floor is all wet, let’s put up the “Caution Wet Floor” Sign. We don’t want anyone to slip and fall after all!
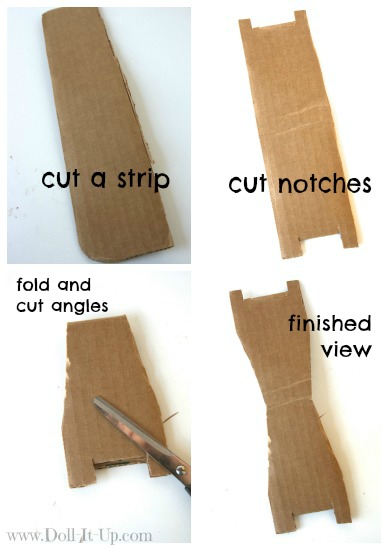
Cut a strip of cardboard about 10″ x 3″.
Cut notches about 1 3/4″ x 1/2″ on both ends of the rectangle.
Fold the cardboard in half. From the cut edge towards the fold, cut an angle in towards the fold.
Unfold the cardboard strip to see the finished view. It is already for the next step!
To make the traditional yellow caution sign, coat both sides of the sign in duck tape. Trim off the extra tape using the cardboard as a guide.
The sign wants to lay flat. We need to encourage it into a standing position! Take a strip of duck tape and fold it in half. Tape each side of the strip to the inside of the front and back of the sign.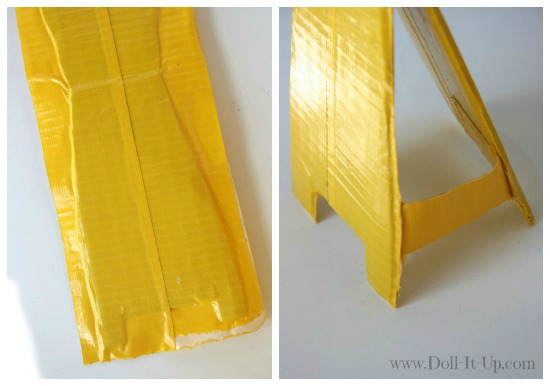
Now for the cautionary detail! You could make all the detail with a permanent marker. I used a combination of black craft foam and marker. Cut 3 strips of craft foam all the same size and glue them into a triangle. Out of another strip of craft foam shape an exclamation mark and glue it to the sign. Write out the words with a permanent marker. 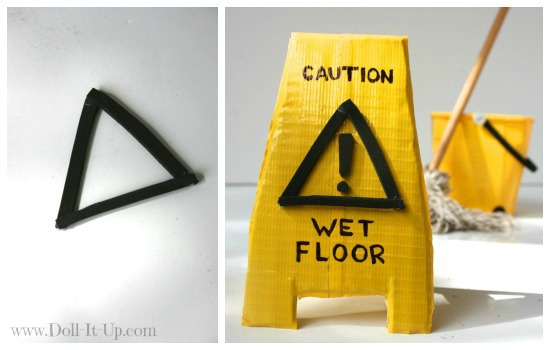
Mop Bucket
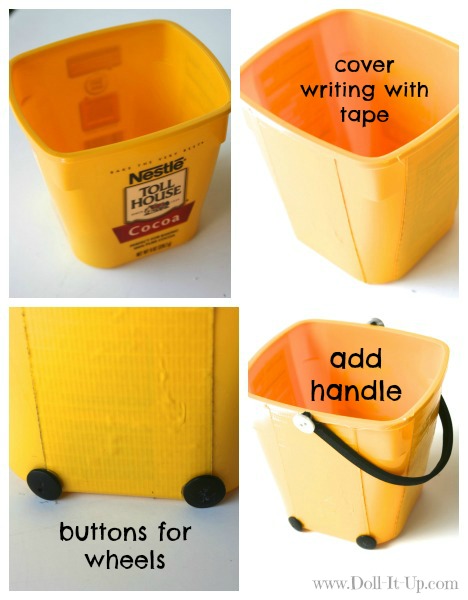
This little mop bucket came to me one day as I was in the pantry. Yes, I relocated the contents to another container! A little soap and water and it was ready to be the notorious yellow mop bucket.
That yellow duck tape comes in handy covering up the lettering on each of the sides of the yellow container. Yellow paper or craft foam would do the job too!
Glue little black buttons, 2 on each side, for the wheels.
The handle is a strip of black craft foam with a silver button at each end.
Time to get back to the chores at hand!
Whether your dolls have Saturday chores or a job they will be able to keep things spic-and-span. It is fun to incorporate everyday life, like the chores into play! Love it!
The floors may be clean but what about the rest of the chores on the chore chart? More cleaning supplies to come with Doll Size Cleaning Supplies {Part 2}!
Anna



How cute, Anna! I can’t wait for Part 2! 🙂 Just curious, where did you get Morgan’s outfit? She looks all ready to tackle the job! 😉
Thanks Molly! Morgan’s hoodie, shoes and shirt are from Springfield Collection. I made the jeans.
This is adorable!!! A quick question do you recommend Morgan (#25) I am planning to buy her and was wondering could you tell me some pros and cons of #25? Thanks!!
We have loved #25. It is such a personal choice picking out a doll. Some things to think about are hair type and length depending on what you are looking for. #25’s hair is easy to manage and long enough to style. Hope that helps if you have any more specific questions I will be happy to answer them!
Thanks anna! I decided I’m going to get her I really like how her hair is long enough to style and manage. Thanks a bunch!!! One question I saw a review on YouTube where they said her hair is dry at the ends is Morgan’s dry?
Our #25’s hair has not been dry at the ends. Good luck in your decision!
Thanks
This is adorable and sweet! I’ll have to add this to my to-do list.
Hi! You won an award on my blog, aggirl79.blogspot.com. This post was featured on The Doll Weekly. Please email me so you can get your award.
-TL
Thanks for the feature! If you need to email me it’s anna@doll-it-up.com
Our products include Doll house hardware and Dolls house hinges with window frames, doors, wooden moldings, glazing and brass hardware
I totally love!
WOW WOW wow WOW wow …………….
Hi Anna,
Our school just did the musical Annie. Both of my sons were in the musical. I am helping with the cast party. I am using small metal buckets & want to make a small mop to go with them. Your mop is perfect!!! Could you tell me about how many times you wrap the yarn around the cardboard.
Thanks so much!
Lorie Barbour
Thanks Lorie! I wrapped the yarn until I liked the thickness of it. You really can’t go wrong! Good luck!