Hello friends!
Today I feel like a food blogger that should be sharing a recipe because this craft is so scrumptious looking!
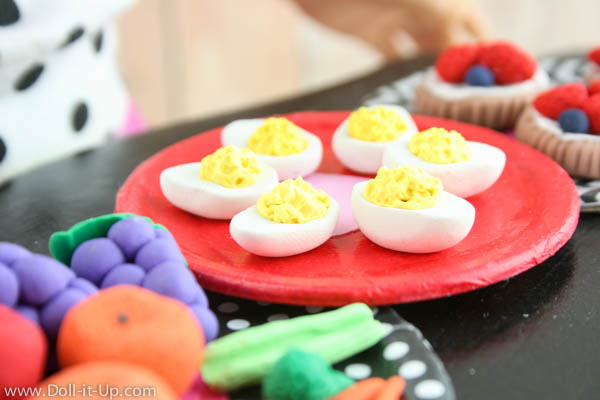
Deviled eggs are on the menu.
When my son saw these mini deviled eggs he asked if we could make some FOR REAL. Yep he’s a deviled egg fan and these just reminded him how yummy they are! HA!
These deviled eggs are made out of Sculpey clay and with a few fun details they look so realistic!
In fact everything in today’s spread was made with Sculpey clay.
I discovered how awesome Sculpey and other bake-able clays are for doll food only a few years ago. Clay was just one of those things I had never tried. So if bake-able clays are new territory for you, you may be amazed how easy they are to work with!
I may be a fan but this post is not sponsored by Sculpey. 🙂 I do get clay from Sculpey to try and that has led me to the craft aisle to buy more Sculpey because it’s awesome for doll food and crafts!
One of my favorite things about Sculpey Clay (and other bake-able clays) is that there’s a quick baking time and it’s ready for play!
Using bake-able clay is easy but I have a few pointers to get you started if you are new to it.
- Looking for bake-able clays? They are sold in craft stores or on the craft aisle in big box stores. Unlike regular clay or air dry clay this clay is baked at low temperatures to harden it. It comes in several brands and types.
- Need a color you don’t have? Just mix two or more colors to get the perfect shade.
- Work with wipes if you are using multiple colors. The color you are working with will transfer on your hands from color to color. Use a baby wipe (or a wet wash cloth) when switching colors to keep the colors bright.
- Use tools to get different effects. You may want to purchase a basic tool kit (they are sold along with the clay at the store), a specialty tool for a specific technique or get creative and use objects from around the house to manipulate the clay. Experimenting with tools is the key to getting the look you want!
- Follow the instructions on the package. The cooking time varies depending on the size of project you make, so refer to the instructions to get it spot on every time!
Let’s get started!
Deviled Eggs
Supplies:
- yellow and white Sculpey clay
- Super Slicer from the Sculpey Essential Tool Kit (or improvise using something similar you have on hand)
Roll the white clay into an oval “egg” shape between the palms of your hands.
Slice the egg in half using the Super Slicer in the Sculpey Essential Tool Kit. The tool is thin and easily slices through the clay without destroying the shape.
See? It’s only a little flattened on the sides and we’ll be fixing that in a second.
Add an indentation to the widest portion of the flat side of each half. It is where the yolk of the egg would be.
The rounded tip of the Sculpey tool is the perfect size. Adding the indentation added a little more shape to our eggs and they have nice rounded sides again!
Roll out yellow yolks to fit in each indentation. I mixed the yellow with a little white to get the right shade.
These are deviled eggs, so add texture to the yolk and flatten it a bit with the pointed end of the tool.
It’s ready to set in the indentation on the white egg.
Since the flattened yolk is a little larger than the space, use the tool to poke it into place.
All that gentle poking only added to the effect!
These are a crowd pleaser so you’ll need at least 4-6 eggs. Bake them according the directions on the package. Mine only took 15 minutes and they were ready for play!
For fun, serve the deviled eggs arranged on a plate like a flower.
I can’t believe I didn’t discover Sculpey and other bake-able clay for doll food earlier!
It is a quick project and surprisingly realistic results!
These deviled eggs make a great finger food to set out with a tasty spread for a doll party.
Here’s the scoop on today’s post:
- Doll– Ivy is a retired American Girl Historical Character
- Outfit– Shirt made by Anna. Tutorial to stencil on shirt is here.
- Scene– Fruit tart tutorial is here. Fruit and veggie tutorial is here. Grape tutorial is here. Plate tutorial is here. Table tutorial is here.
Make something scrumptious for doll play today!
-Anna


Great tutorial! I love the finished product as it seriously looks so real.
I have been meaning to buy sculpey clay for months! I have a project or two I need to finish first, then I will buy it!
What should use and how would I add the red paprika on top of the eggs?
Glitter might work as paprika. I used glitter with clay and it works pretty well. Sprinkle it on and press it in slightly before you bake. Try it on one to see how you like it first! Good luck!
I used for the paprika on top of the eggs a red sharpie pen lightly dotted on the yellow. Worked great !
oops I forgot to add I added the red dots with the sharpie on the yellow for paprika, after they were baked and cooled.
Awesome tip Sue! Thank you!